
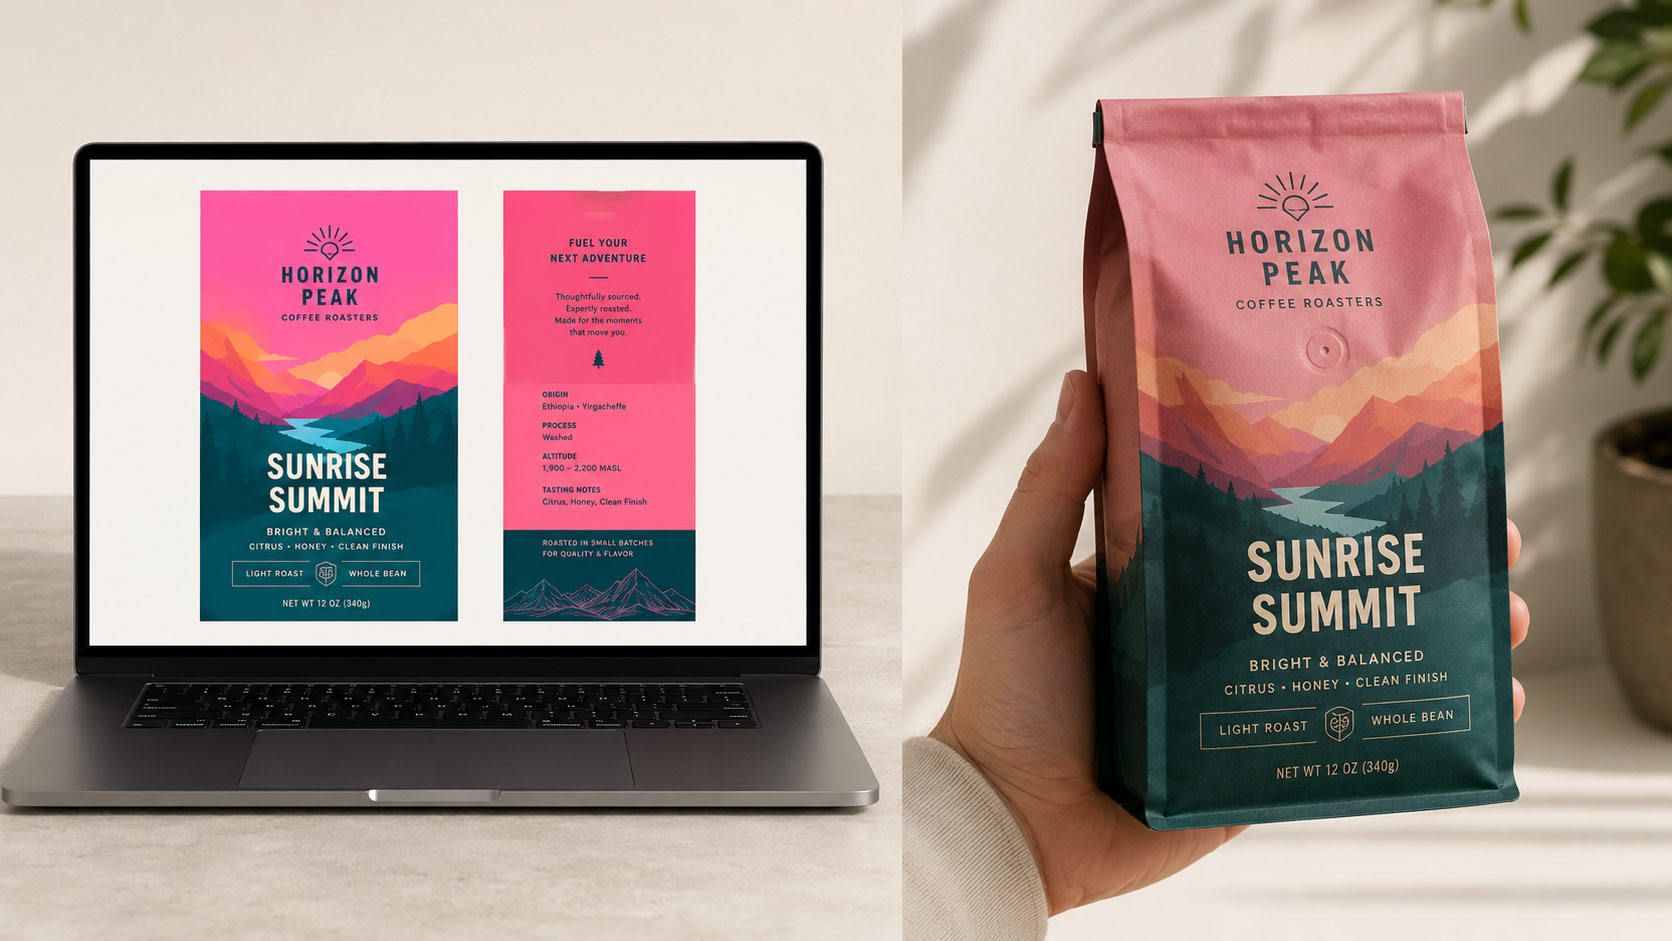
The Color You Approved and the Color You Got Are Rarely the Same
Almost every roaster who orders custom packaging for the first time runs into the same surprise. The bag shows up, the design is sharp, the print is clean, and the color is just a little bit off. The teal you picked looks flatter. The warm red leans toward brick. The soft cream looks gray under store lights. Nothing is technically broken, but the bag in your hand does not match the bag you approved on your screen, and now you are stuck deciding whether to live with it or eat the cost of a reprint. Coffee bag color matching is the single most common place where a custom packaging project goes sideways, and it is also the most preventable. The reason this happens so often is that color feels simple and is actually one of the most technical parts of printing. You picked a color you love, you saw it glowing on a bright screen, and you assumed the bag would look the same. But a screen and a printed bag are two completely different things. One makes color with light, the other makes color with ink sitting on a surface. Once you understand why those two never line up on their own, you can take a few simple steps that make your finished bags match your brand every single time. Let's walk through what actually causes the shift and how to control it.Why Screens and Bags Speak Different Color Languages
Your computer, your phone, and your tablet all build color out of light. They mix red, green, and blue light to create everything you see, which is why designers call it the RGB system. Light is bright and additive, so screens can show colors that glow, like an electric blue or a neon green that almost looks like it is lit from inside. That is the color you fell in love with when you designed your bag. The problem is that no printed surface on earth can glow. A bag does not make its own light. It just sits there and reflects whatever light hits it. Printing builds color a different way, by laying down ink that absorbs some light and bounces back the rest. Most printing uses four inks, cyan, magenta, yellow, and black, which is why it is called the CMYK system. When you take an RGB design and send it to a printer, every glowing screen color has to be translated into a recipe of those four inks. Some colors translate almost perfectly. Bright, saturated colors usually cannot, because ink simply cannot reach the brightness that light can. That gap between what your screen shows and what ink can reproduce is where most color disappointment lives.- Screens make color with light, so they can glow and look very bright
- Bags make color with ink, which can only reflect light, never produce it
- The brightest screen colors often cannot be matched by ink at all
- A design built in RGB always has to be converted to CMYK before it prints
What Pantone Colors Actually Do for Your Bag
This is where Pantone comes in, and it is the most important tool you have for coffee bag color matching. A Pantone color is not mixed from the four standard inks on press. It is a specific, premixed ink with its own recipe, like buying a can of paint that is mixed to an exact formula instead of trying to blend the shade yourself from primary colors. When you tell your packaging partner that your brand color is a specific Pantone number, you are handing them a fixed target that does not drift. They mix that exact ink, and your green is the same green on the first run and the same green a year later. Pantone colors matter most for the parts of your bag that have to stay consistent, which usually means your logo and your main brand color. A customer's eye is very good at noticing when a brand color shifts even slightly from one bag to the next, and that inconsistency quietly makes a brand feel cheaper. Using a spot color, which is the printing term for a premixed Pantone ink, locks that color in place. It does cost a little more than printing everything from the four base inks, but for the one or two colors that define your brand, it is almost always worth it. You can still print photos and detailed artwork in CMYK on the same bag and reserve the Pantone ink for the color that has to be perfect.- A Pantone color is a premixed ink mixed to an exact, repeatable formula
- Spot colors keep your logo and brand color identical across every run
- CMYK is fine for photos and detailed art that does not need to be exact
- Most bags use a smart mix of both, Pantone for the brand color and CMYK for everything else
The Film Underneath Changes Everything
Here is the part that catches even experienced brands off guard. The exact same ink looks different depending on the surface it is printed on. Ink is never fully solid. A little bit of whatever is underneath always shows through and mixes with what your eye sees. This is why your red logo can look bright and clean on a white bag, slightly muddy on a kraft paper bag, metallic and cool on a silver foil bag, and washed out on a clear frosted bag. Same ink, four different results, because the surface under the ink is doing half the work. The fix is something called a white underprint. Before your color goes down, the printer lays a layer of solid white ink first, which creates a clean, neutral base so your real color shows up true instead of mixing with the bag material. On metallized foil bags and kraft bags, a white underprint is the difference between a color that pops and a color that looks dull and dirty. If you are printing on custom coffee bags made from foil or kraft, ask whether your design includes a white underprint behind the colors that matter. Sometimes you may want the foil or the kraft to show through on purpose for a metallic or natural look, and that is a great creative choice, but it should be a choice you made, not a surprise you discovered when the order arrived.- The same ink reads differently on white, kraft, foil, and clear film
- A white underprint gives ink a clean base so colors stay true
- Foil and kraft especially need a white underprint to keep colors bright
- Letting the bag material show through can be a smart look, as long as it is intentional
Digital and Rotogravure Handle Color Differently
How your bag is printed also shapes how color behaves, and the two main methods handle it in different ways. Digital printing works a lot like a very advanced office printer, building your design from the four base inks plus white. It is fast, it is affordable for small runs, and it is fantastic for detailed photos and artwork with lots of shades. Its one limit is that classic digital printing builds color from CMYK, so matching a very specific Pantone brand color takes a skilled press operator who knows how to dial it in. A good digital packaging partner can get remarkably close to a target Pantone, and for most brands that closeness is more than good enough, especially on short and seasonal runs. Rotogravure printing is the high volume method, and it uses engraved cylinders that lay down ink in a rich, consistent layer. Because each color gets its own dedicated cylinder and its own ink, rotogravure can run true Pantone spot colors with excellent consistency across very large orders. That is one reason brands running big, year round volume often lean toward rotogravure bags for their core lineup. The tradeoff is that the engraved cylinders cost money to make, so rotogravure only makes financial sense at higher quantities. The simple way to think about it is this. Digital gets you very close with no setup cost and is ideal for smaller and seasonal runs. Rotogravure gets you exact spot color matching and is built for high volume. Neither one is better in every situation, they are built for different jobs.The Proof Is the Most Important Step You Can Skip
A proof is a preview of your bag before the full run is printed, and skipping it is the most expensive shortcut in packaging. There are two kinds, and they are not the same. A digital proof is a file or a printed sheet that shows you the layout, the artwork, and the general color. It is great for catching a typo, a misplaced logo, or a wrong ingredient line. What a digital proof cannot do is show you exactly how the color will look on your real bag material, because it is usually printed on paper, not on your actual film. A press proof, sometimes called a production proof, is printed on your real bag material with your real inks. This is the only proof that tells the truth about color. It costs a little and it adds a few days to your timeline, and both are worth it many times over. Approving a press proof means you are signing off on the actual color you will receive, not a hopeful guess on a screen. For a first order, for a brand color you care deeply about, or for any large run where a mistake gets multiplied by thousands of bags, a press proof is not an extra. It is insurance. The roasters who get burned by color almost always skipped this step to save a few days, and the roasters who never worry about color almost always insist on it.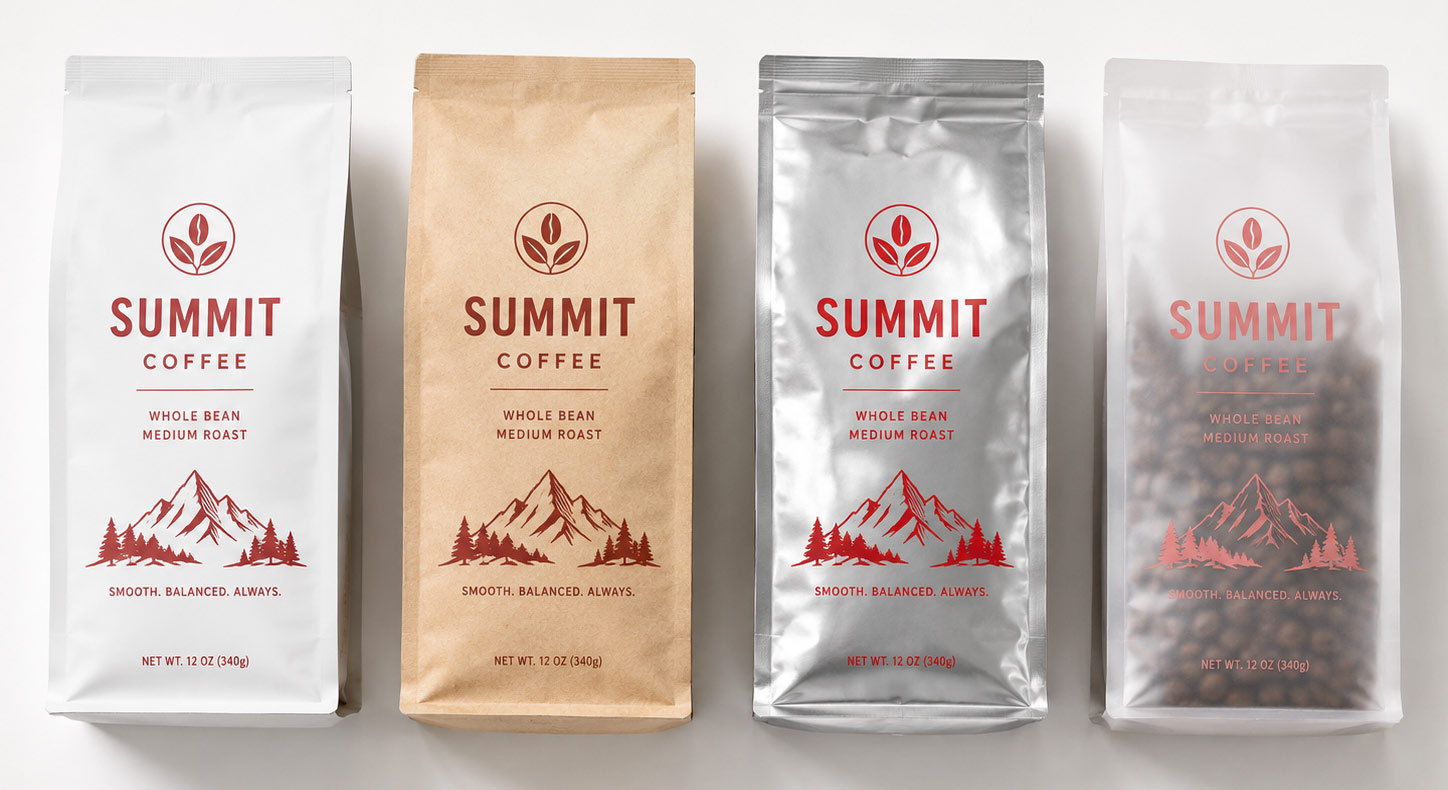
- A digital proof checks layout, text, and artwork, but not true color
- A press proof is printed on your real bag material and shows real color
- Always get a press proof for a first order or a critical brand color
- A few days and a small cost upfront beats reprinting an entire run
How to Set Your Brand Up for Consistent Color
Getting color right once is good. Getting it right every single time, across every bag style and every reorder, is what actually builds a brand. The way you do that is by defining your colors clearly from the start and writing them down so nothing is left to memory or guesswork. Pick your brand colors as specific Pantone numbers, not just as a vague description or a screenshot. Note the coated and uncoated versions, since a Pantone color looks slightly different on a glossy surface than on a matte one. Keep those numbers in a simple brand sheet that you send with every order, so your packaging partner is always working from the same target. It also helps to think about color consistency across your whole product family, not just one bag. If you sell coffee in several sizes, run a single origin line, and also offer a few food packaging items like granola or chocolate, you want the brand color to read the same across all of them even though they may print on different materials. That is only possible if everyone is matching to the same Pantone target with the right underprint for each material. Lock these details down once, save them in your brand sheet, and color matching stops being a gamble on every order and becomes a settled part of your process.- Define brand colors as specific Pantone numbers, not screenshots or descriptions
- Note both coated and uncoated versions, since the surface changes the look
- Keep a simple brand sheet and send it with every single order
- Match every product in your lineup to the same target for a consistent look
Closing: Color Is Not Luck, It Is a Process You Control
Stop Guessing and Start Matching: Your Brand Color, Locked In for Good The shift between the color on your screen and the color on your bag is not bad luck and it is not a printer cutting corners. It is the simple, fixable result of screens making color with light while bags make color with ink, plus the surface under that ink quietly changing everything. Once you know that, coffee bag color matching turns from a frustrating mystery into a checklist you can actually follow. Build your brand color as a Pantone target, ask for a white underprint on foil and kraft, choose digital or rotogravure based on your volume, and never approve a big run without a press proof on your real material. Do those four things and the bag in the box will finally match the bag in your head, on the first order and on every reorder after it.Why Us?
 3x SCA Best New Product Award Winner
Industrial Compostable Packaging
Your Very Own White Label Mobile App
Pono Collective: Providing Coffee Education
Lower MOQs With Our Digital Print Process
Setting Trends While Elevating Your Brand
Contact Our Team!
Other Blogs of Interest


What is the Best Color for a Coffee Brand?
The Power of Color in Specialty Coffee Branding In the competitive world of specialty coffee, the role of color is pivotal. It goes beyond mere aesthetics; it becomes a statement. The right color for your branding can evoke emotions, convey a message, and ultimately create a lasting impression. Ou...


How Coffee Bag Color and Finish Drive Sales on the Shelf
Bold Bags Brew More Attention In a crowded coffee aisle, package color and finish can make or break a shopper’s first look. Bold hues grab attention fast, and the right material helps those inks look crisp and rich. Using the shelf photo as our guide, the bags that jump out first are bright yellow,...


Make Your Coffee Packaging Bag Pop with Hot Foil or UV Gloss
Matte Coffee Bags Using Hot Stamp or Spot Gloss The Power of Hot Stamp on Matte Coffee Bags Hot stamping uses heat and pressure to press metallic or colored foil into your packaging. The result is a bright, reflective layer that grabs attention. It's great for making logos or bold names shin...


Custom Packaging: Rotogravure or Digital Printed Coffee Bags?
The very first step is knowing which print process to choose. Here at Savor Brand we offer two types: Digital Rotogravure Both print print processes are great options for custom coffee bag packaging and we're here to help guide you towards the best print option for your business needs! ...